The bees are busy and buzzing in our backyard this time of year! We have a full garden with lots of blooms for them to visit. Not to mention we have a yard of clover that we purposely do not spray with chemicals just for their well being. I try to take care of them and they take good care of our garden plants and fruit trees. In particular this time of year we rely on them to pollinate our cucumber plants. There’s nothing quite like the smell and taste of a cucumber straight out of the garden. Those waxy specimens you get at the grocery wane in comparison. When the cucumber bounty is coming in, we are using them every way we can think of; in salads, as crackers and of course we make pickles! In our house we love little jerkin pickles. The beginning of the growing season is the best time to get the most “little”cucumbers all at once. You can do whatever size you like, spears, slices or whole pickles. The process for all of them is the same. If you’re a beginner canner I highly recommend trying pickles first. They’re so easy to make and they help you understand the process you need to do in order to can.
Canning can be done using a water bath canner or a pressure cooker. When canning pickles, jams, jellies, fruit butters, tomatoes, salsa, pretty much any fruit or vegetable that is acidic a water bath canner is safe to use, but for meat and starchy vegetables like green beans and corn you need to use a pressure cooker to ensure the temperature gets hot enough to eliminate any harmful bacteria that can spoil your food. However, tomatoes of any kind can be canned in both a water bath or a pressure cooker, a pressure cooker just shortens your processing time from about 45 minutes to about 15 to 20 minutes. For pickles you will always use a water bath canner, a pressure cooker would cook the cucumbers and they’d be very soft and soggy. Because of the vinegar used in pickling, making them acidic, a water bath canner is the preferred method to canning pickles. The same is also true for jellies, jams, and fruit butters in that a water bath canner is the easiest and generally preferred method of canning. In the pictures below is my water bath canner on the left and a pressure cooker on the right. I do have one, but they’re super heavy and I didn’t feel like digging it out for a photo shoot.


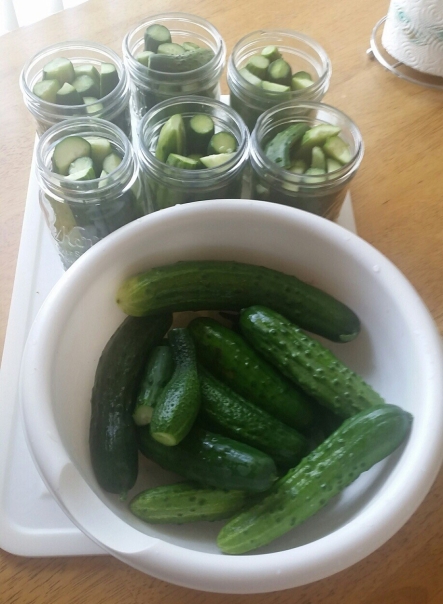
Ok, so first things first, you pick your cucumbers and give them a good cleaning in the sink. You’ll also want to make sure you have plenty of clean jars. Go ahead and halfway fill your canner with water and put your jars in to have them sanitizing in hot water. A canner holds 7 jars so I usually try to have at least 8 jars ready. Now, back to the cucumbers, start slicing or preparing them based on what kind of pickles you want (slices, spears, whole, etc…). Remove your sanitized jars from the canner using a jar lifter and carefully place them on a kitchen towel. Hint: hot glass is temperamental and can crack and break easily. You can then begin stuffing the jars as tight as possible with your cleaned and cut cucumbers. Try to get the jars as full as possible so you don’t have to use as much pickle brine and also so there is less air in the jars which can lead to shorter shelf life.
Now, once jars are full of cucumbers, you start getting your pickle juice cooking on the stove. I use a pickle mix, Mrs.Wages kosher dill mix. You do not have to do this, I just love the quality, convenience and consistency of the mix. There is directions on the back for the measurements of water, vinegar and pickle mix. It’s pretty straight forward you combine all the ingredients and bring it to a boil. Once your brine is boiling, remove from the stove and place near your stuffed jars. One by one using a ladle and canning funnel fill your jars within a half inch from the top rim. Once all jars are filled, wipe the rims to remove any spilled liquid and then cap the jars with your heated ring and lids. Put them on together and just hand tighten, don’t over tighten or your jar can bust in the canning process.


Alrighty, jars are filled with cucumbers and hot brine and they’ve also have lids. The next thing to do is get your jars into the water bath canner. Using your jar lifters, one by one carefully place the jars into the rack inside the canner. When all 7 jars are in canner, put the lid on canner and double check the heat is on high. You want to get the canner up to boiling as quick as possible so that you have good and crunchy pickles. Once you see steam coming from the lid you can begin counting your processing time, which for pickles in pint size jars is 10 minutes. Once your 10 minutes is up remove your jars using jar lifters again and place the jars one by one onto a kitchen towel. You do this because placing them on a cool countertop can bust a jar. Always, always use towels on the counters when canning. The pic below is a typical jar lifter used in canning.

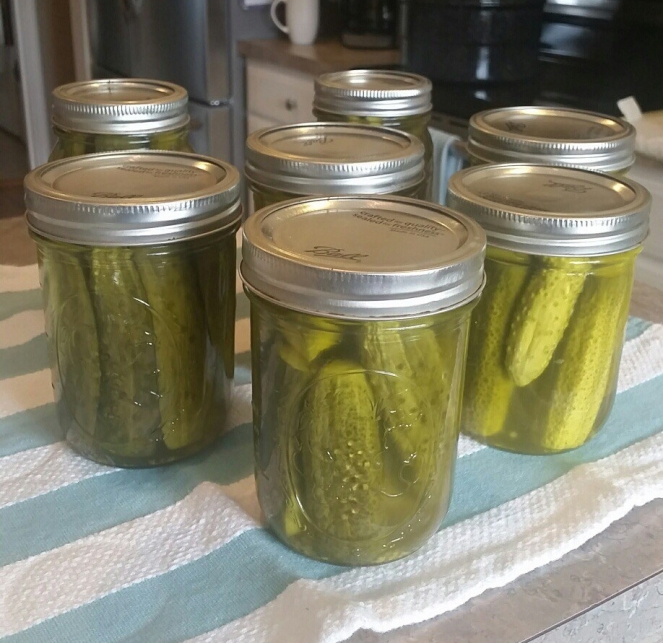
Before long, probably within a few minutes you should hear the magnificent sound of your jars “popping” and therefore sealing. Woo-how you did it! Easy-Peasy!! Just repeat this process until you run out of cucumbers and brine. Your pickle loving self/family should have tasty pickles for the year to come. This whole process only takes about 2 hours. It’s a great way to get your feet wet in canning. If I can do it, you can do it. Good luck on your canning adventures. Here’s batch 1 of 2 for me from last Saturday!