DIY · Family · Renovation

DIY…….Baby steps

I’m not gonna lie, I love a good crafty project.  I love making gifts and Christmas decor, crocheting, and making jams and jellies, but messing with wood is on a whole other level for me.  I think I feel as if I’m gonna mess the wood up and then there’s no going back.  Sooooo, I took on a kitchen project and decided to get back to working on it this past week.

About a year ago we got a new kitchen table(new to us) that came with a bench. The way our kitchen is,  the kitchen table sits up against a big window. So my reasoning is the bench will go better up near the window than some chairs, plus I can fit 3 kids on a bench instead of 2. Anyways, the table and bench are both light oak with antique white legs. The chairs I had just bought were a dark walnut with antique white back and legs.  My project is to stain the table top and top of bench to the dark color matching the chairs.   In my head it was super simple, sand the finish off, wipe on some stain (maybe 2 coats), then paint on a layer of poly-urethane. Easy peasy!  Well…….things aren’t always as easy as they seem.


First things first, I started with the bench. It’s smaller and if I mess it up I figured it wouldn’t be as noticeable as our actual table.  I got out my little hand held sander and sanded the finish off in just about 30 minutes or so.  I thought to myself, “yep I got this….just like I planned”.  Well, 3 months later the sanded, unfinished bench is still in my kitchen.  So I’ve spent the summer with 3 different colored woods in my dining set.  Oh well, life is busy and sometimes you just gotta chill..you know?  Ok, back to it though. This past week I got it out to the garage and started the staining process.  I cleaned it off really well and started wiping the stain on with an old soft rag we had. I used MinWax Wiping Stain, basically because it looked like the simplest route.  I wiped the whole bench top down moving in the direction of the wood grain. I let it sit for 3 minutes, then I wiped off the excess in the same direction as the wood grain as well.  After wiping off there a few spots that had a much lighter stain so after 4 hours of drying I reapplied the stain to the areas I wanted it to be darker.  So far, so good.


All was looking good and going to plan.  The next step was to add a coat or two of poly-urethane to help protect the wood and keep it’s finish.  I used the MinWax fast drying clear poly-urethane.  I used a soft brush to apply the varnish. All seemed well at first, until the next day after allowing for 12 hours dry time. I ran my hand along the bench to see if it was dry, and it was. However, there was these spikey pit things all over it.  At first I just looked at it and considered just letting it go, mainly because I wasn’t sure why it was like that, but after much examination I realized that the grass, dirt and dog hair that gets blown around in our garage, had in fact landed on the poly-urethane while it was drying.  Not what I was in the mood for at all.

So after sulking for two days, I sanded down the pitty areas (which didn’t take as much stain off as I had thought it would).  The bench was smooth again and I applied a little more stain to those areas that needed it.  This time I cleaned up and swept up the garage and made sure no one would be pulling the lawnmower or any vehicles in and out of the garage for at least a day while this sucker was drying. The next day I had myself a beautiful bench that matches my chairs!! Woo-hoo!! Now I just gotta get myself moving on the table….that’s  why I called it baby steps..lol

Camping · DIY · inspiration · Renovation · RV

Not-So-Happy Camper

It was to be a wonderful memory making machine. Yes, we bought a camper. We dove in head first, bit the bullet, jumped in with both feet..however you want to say it, we bought it. Now, let me clarify that it’s not a brand new shiney, turnkey, off the lot new camper. It’s an older hybrid style camper with a slide out and full bath. We wanted an affordable camper with no payments and one that our kids could have fun in and us not completely be on to them about messing it up. I mean camping should involve swimming, fishing, hiking, dirt, bonfires and good food right? My point is we were looking for a good used camper for our family to try out this camping thing.

Fast forward to a good deal with a seemingly trustworthy guy who had an answer for everything and here we are with an unexpected project. Turns out the floors were rotted under the peel-n-stick tile along with rotted support beams and a busted hose. There’s more, the seals are rotted, it needs some repairs to the seal trim edges on the outside, new tires and rims, the roof needs a major cleaning and conditioning, all cabinets need painting and new fabrics all through out…….not to mention a good cleaning from top to bottom.


I should explain that we have zero camper/rv experience and an equivalent amount of renovation experience to match. Soooo, step one was to take a deep breath and let it all sink in that this is just a camper and not our home. Second step, we had to commit to this project. Step three, cram our brains full of Pinterest ideas and methods.


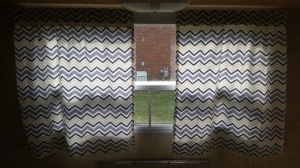
After a lot of reading, skimming and online perusing…..we sort of have a plan. Since this was more of my idea than my husband’s, I was the first one to jump in and get my hands dirty. The very first thing I did was rip all the curtains, valances and blinds out of our camper. I can’t say that the camper stank, but it had this odd smell sort of like stale aftershave. I couldn’t deal with it, so down came the curtains. This camper is a hybrid camper so the pop-out beds have curtains for privacy as well, needless to say there was a lot of ugly smelly fabric in there. I finally, after 7 years of owning a sewing machine, learned how to use it. I used my chevron patterned fabric for the curtains and the paisley type print for the kitchen benches. I have been able to complete all the curtains, but still have one set of cushions left to cover.   Next, I started ripping up the tile looking peel-n-stick flooring. Easy-Peasy in my mind. Ha!! Well, not so easy, the floors were laid with extra adhesive. They’re so sticky that the glue left behind after ripping the floor up, will take the shoes right off your feet!! So, I halted the floor removal until I get it all painted. I can’t imagine the entire floor being one giant sticky mouse trap. The plan is nice pretty wood plank peel-n-stick for the floors once all the painting is finished.

Onto the massive undertaking of primering and painting all the cabinets, storage areas, breakfast benches, the bathroom door and any of the walls that are wood paneling. Shew!! What was I thinking? So, first thing to do remove all the cabinet doors, hardware and hinges. It took me about 2 1/2 hours just for that, but the bright side is, there’s plenty of storage. Then, onto the forever task of the primer coat. I initially thought it would need 2 coats of primer but, I’m seriously considering only 1 coast now. I used BullsEye 123 primer. It’s for all surfaces including paneling and plastic, plus it doesn’t require sanding. Score!! I’m painting with an angled trim brush and a mini foam roller for a smooth, even surface. Here are some pics of what I have done so far.

As you can see I have a long way to go, but where there’s a will there’s a way. My plan is to keep rollin’ and brushin’ until all cabinets and wood surfaces are white. My curtains are finished as well as one set of dinette cushions(one set to go). I will also be hanging the bed curtains once all the painting is done. Due to the lengthy nature of this project this will be a 2 part post. Fingers crossed, my next camper post will be a beautiful Pinterest worthy completed renovation!